Some Digital Photography Techniques
I've always loved photography, and even had a small darkroom when I was a kid. But I never got very good at the processing end of things, and never progressed past black and white. With digital photography that has all changed - techniques that were difficult or nearly impossible in a dark room can become nearly trivial in Photoshop or a similar photo editing package. I feel like I've been waiting all my life for digital photography to arrive! If you are still not convinced to make the switch from film, or would like more information about the difference in capabilities between digital and film here is a useful and technical comparison of Film vs Digital.
You do not need to spend the money on Photoshop for a good graphics editing program; there are a number of capable photo editing applications available. The Gimp (GNU Image Manipulation Program) is very capable open source, and free, software that can be readily downloaded. It has pre-compiled versions for many platforms. Here's the link to the Gimp pre-compiled Program for Windows. And of course there are many applications available for sale, including Paint Shop Pro which has many capabilities similar to Photoshop and retails for well under $100. Another good option, for the same price is Light Zone. LightZone is a bit different from some of the others mentioned above in that it specializes in adjusting lighting effects in digital images.
Here are some
direct links to the topics below:
Digital Camera Noise Reduction
Restoring Faded Colors for Scans of Old Photos
Increasing Dynamic Range with Multiple Exposures
Depth of Field Trade off - Aperture vs Diffraction
Increasing Depth of Field with Multiple Exposures
Scope Adapter
Legal Information for Photographers
Links to Various Tutorials
Digital Camera Noise Reduction
Digital cameras generally do very well in a brightly lit scene, but some 'noise' can creep in for dark areas or those in which the ISO (equivalent digital 'film speed') has been increased for low light level conditions. The short explanation is that in any electrical sensor there is some very small random signal ('noise') present. For a digital camera image sensor, dark areas of a photo correspond to very little signal (light) reaching the sensor. Thus the desired signal is not much larger than the random 'noise', which can lead to a speckled appearance. Turning up the ISO setting for a low light level magnifies this noise. Some higher end cameras have various techniques for dealing with this, but you can still end up with the grainy appearance in your photos.
Avoiding or minimizing noise can begin with the exposure settings on your camera, as discussed in this Expose Right Tutorial (exposing for maximum Signal/Noise - S/N - ratio by moving the bulk of the histogram towards the 'right' or higher signal end.
Photoshop and Paint Shop Pro both have built-in software capabilities for reducing digital noise, and there are a number of other products on the market developed specifically for this purpose. Here is a Review Of Noise Reduction Software. I have found Picture Code's Noise Ninja to work very well. Below is an example. The left pane is the original image, which was badly underexposed. The second pane shows the result of adjusting the RGB levels to obtain a better exposure. The exposure and colors are much improved, but at the cost of a very grainy/speckled appearance. The third pane shows what Noise Ninja was able to do for reducing the noise.

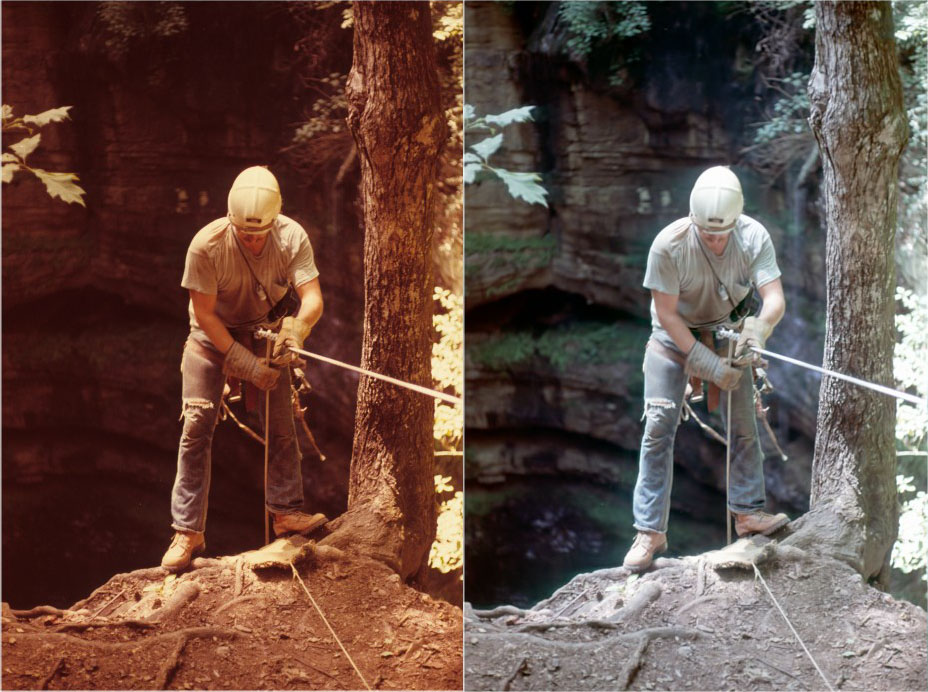
Restoration of Color For Scanned Photos
Some basic photo editing skills can easily do a great deal to correct many faded and color shifted photographs without any additional software. The earlier these skills are applied in the scanning process, the better the overall result. However, satisfactory results can often be obtained by adjusting only in the "post processing" phase of things, if that is all you have to work with. Here is one Restoration of Color (ROC) Plug-in for Photoshop which greatly automates the adjustments.
For an advanced reference, the Digital Retouching Book has loads of good information. Finally, a good scanner and software can do much right during the scanning phase. The scans below were made using the Nikon 5000 Slide Scanner with the automated Restoration of Color option turned off (left) and on (right). The image on the left is pretty much what you see when you hold the slide up to the light. This same effect can be approximated with the scan on the left in post processing, but not as well. That is because the scanner is able to use the full 16-bit depth from the scan sensor to create the 8-bit final result. When post processing, you are starting out with an 8-bit image and 'stretching' the more limited amount of information, which can result in 'banding' and a blotchier result.
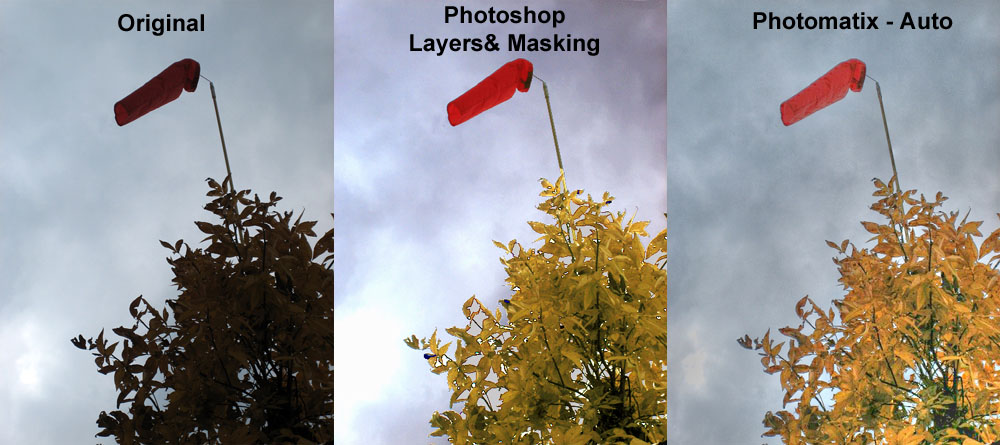
Enhancing Dynamic Range By Multiple Exposures
Layers and Masks
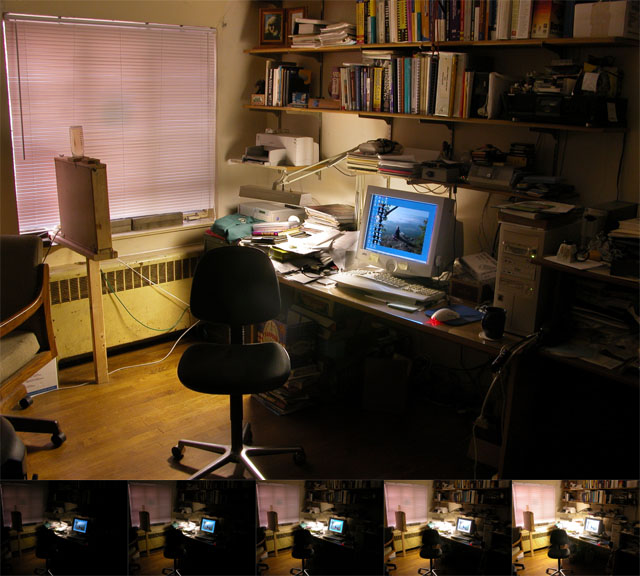
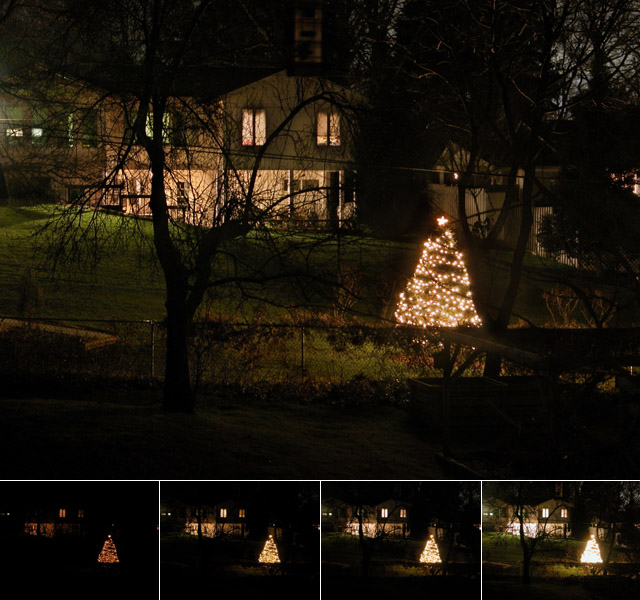
Photomatix Automated Software Method
Depth of Field Trade off - Aperture vs Diffraction
In Macro Photography it
is tempting to set the maximum aperture number (minimum diameter opening) to
obtain the maximum Depth of Field, and then blast it with enough flash to get
the correct exposure. However, you may end up gaining depth of field but losing
sharpness if you go too far. That is because of Diffraction. As the aperture opening becomes very small, diffraction
begins to degrade the image. At what point this happens depends on the sensor
(actually, the individual pixel) size and other factors. However it is easy
enough to determine with your own camera and lens.

Check the full size result carefully. You will see that more of the text on the folded right portion comes into focus as the aperture (f-stop number) is increased. But also pay close attention to the 'R' on the left side. The camera is correctly focused for this region of the page, and it is sharp and clear for all the low f-stop numbers, but begins to lose sharpness somewhere around f20, and is quite degraded by f45.
Now, none of this means you shouldn't go to the very high aperture numbers if you absolutely need to get the depth of field, but realize that the depth of field comes at a cost. If you can get the photo with a lower aperture, then that is the best choice. Do your own tests, and decide what works best for you.
Increasing Depth of Field (DOF) Via Multiple Exposures

Scope Adapter
Photography - Some Legal Information
The Photographer's Right has a down loadable Adobe PDF file which is printable guide to common photography law, written by a lawyer. It is a handy guide to print and carry in your camera bag for those times when you may be accosted by well meaning, but mis-informed individuals.
State by State Privacy Guide is a compilation of laws by state with respect to photography and invasion of privacy legal rulings.
Some Processing Tutorials
Laurie McCanna's Digital Techniques has a number of useful tutorials for Photoshop and other image processing programs.
Digital Imaging Help has a large number of useful links to most all aspects of digital imaging.
Photoshop and Paint Shop Pro Tutorials
Digital Photography Workflow is a suggested series of processing steps by one photographer.